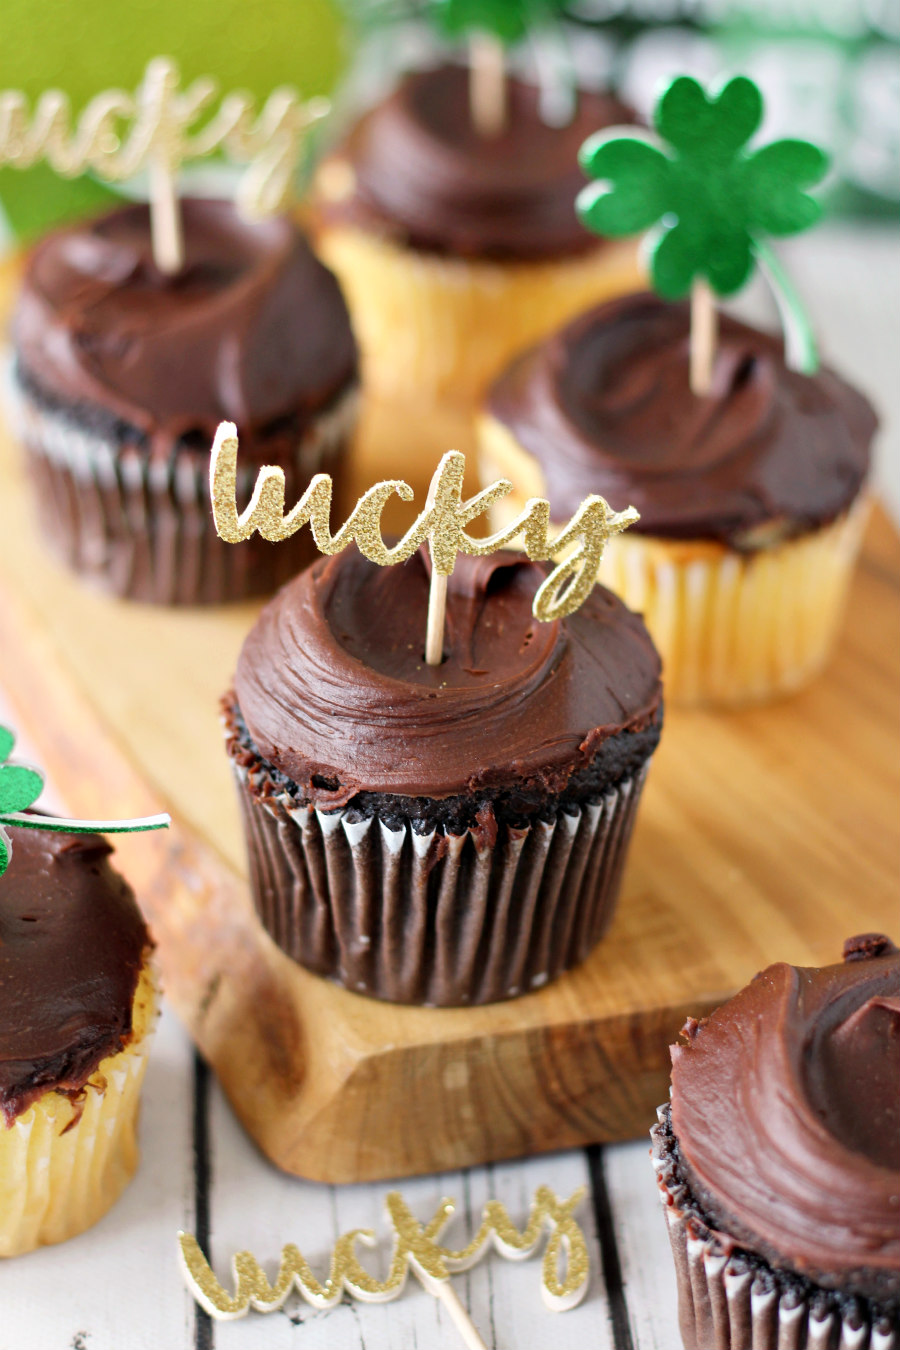
Dress up store bought cupcakes for St. Patrick's Day with these Easy St. Patrick's Day Cupcake Toppers made with heavyweight sparkle paper, glue, and toothpicks.
This post may contain affiliate links. Making a purchase through one of these links helps support this blog.
Paper projects are one of my favorite things to create with my Cricut machines! This is probably why I have a storage container overflowing with different colors of paper and cardstock. I love making homemade cards for friends and family, bookmarks for the Little Free Library in town, and cake toppers for special occasions.
Since St. Patricks' Day is one week away, it's given me a good excuse to break out my green and gold glitter cardstock and make some cake toppers. But instead of serving a whole cake for St. Patrick's Day, I thought I'd dress up some store bought cupcakes with DIY cupcake toppers instead.

Using my Cricut Maker, I cut simple shamrocks out of green glitter cardstock and the word "lucky" out of gold glitter cardstock. Once the designs were cut, I heated up my glue gun and added a drop of glue to the end of a couple toothpicks. Then, I attached the cut designs to each side of the toothpicks and they were ready to use!
Easy St. Patrick's Day Cupcake Toppers
It's so easy to make these simple, sparkly, St. Patrick's Day cupcake toppers using the Cricut Maker. Once they're put together with glitter cardstock, glue, and toothpicks, press them into the top of cupcakes to dress them up for St. Patty's Day!

The first thing I did was design my cupcake toppers in Design Space. Once I was settled on images and text, I made sure to duplicate each design and mirror it. That way the cupcake toppers will look the same on each side.


Next, I cut the designs out of heavy gold and green cardstock. Each color was placed on a LightGrip mat before cutting with the more pressure option (to ensure that each cut was clean). Then, I was able to easy pop each design out of the cardstock once the cuts were complete.

Then, I heated my hot glue gun and positioned toothpicks onto the back of each cutout. I glued one side of the design to the toothpicks. Then, I repeated with the other side to complete the cupcake toppers.

Once the glue dried, they were ready to use! So I grabbed some store bought bakery cupcakes and pressed the toppers gently into the top of each one.

SUPPLIES
- St. Patrick's Day Cupcake Toppers file
- Cricut Maker
- Fine-Point Blade
- Glitter cardstock
- Green
- Gold
- LightGrip Mat
- Hot glue gun
- Toothpicks
STEPS
- Open the cupcake topper design in Design Space. Then, click Make It.
- Place a sheet of glitter cardstock onto the LightGrip mat. Set the material to glitter cardstock and set the pressure to more. Then, load the mat into the machine, and press Go to cut.
- Once the design has been cut a second time, carefully remove it from the mat.
- Heat a hot glue gun. Then, add a dab of glue to the toothpick and place on one side of the cupcake topper.
- Add another dab of glue to the front of each toothpick and place the other side of the cupcake topper on top.
- Allow the glue to dry. Then, carefully press the cupcake toppers into the top of each cupcake.

If you want to go big and serve a cake for your St. Patrick's Day dessert, just open the design file and resize the images to make them large enough to fit your cake. You could also use them to dress up charcuterie, a fruit platter, or even St. Patrick's Day drinks!
Did you make this Easy St. Patrick's Day Cupcake Toppers project? Share it on social media using the hashtag #holokahome. Don’t forget to tag me @holokahome!